Tuesday, April 13, 2010
Monday, December 7, 2009
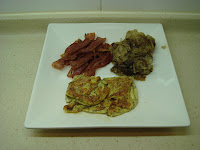
The photo below is of me at Cheese Burger restaurant in Waikiki Beach Hawaii. Worth a review, eat with me what we ordered.

The outside of the restaurant is very inviting. The windows are all open to the soft breeze of the Hawaii trade winds. This is very nice to dine with the wind blowing through. It’s kind of like being a part of the earth. They have ceiling fans, but I do not think they really need them, or maybe it might be decoration. The restaurant is decorated with fun stuff giving one the feeling that they really are on Polynesia.

We were greeted at the door with a smile that made us most welcome.
Unfortunately the young person at the door may have been the most devoted person in the restaurant. There was a manager running around, but he was much too busy to spend any time with customers. We were seated promptly, and menus were presented at once. It would have been nice to have had a bit of a menu presentation as this was the first time to visit.
On the tables they had items that I think one can purchase. We were not sure if the tiki glasses were for sale as the tables had no information if the items could be purchased. A waiter dressed in a grass skirt took our drink orders, and he informed us that he would return back for our food orders. We didn’t mind this as it was our first time to visit here, so we went over all of the food items listed.
We ordered cheese burgers (what else), and in five minutes we received our order to our great surprise. The service here was fast! The waiter threw in front of us two plastic baskets with a lone burger in each basket. There were no French fries, no pickle or garnish, just the cheese burger. Well I guess we got what we ordered.


I’m sad to inform you that the burgers were dry as they were cooked once, then heated up when served. This confirms why we received our order so fast. The burgers were tasteless, and not worth the money we were charged. This restaurant is a tourist trap, and my recommendation would be to miss this one. The food could be better but in my opinion they just don’t care.
 Let's Eat, Rock and Roll!
Cook It - The Rock and Roll Chef - Eat It

The outside of the restaurant is very inviting. The windows are all open to the soft breeze of the Hawaii trade winds. This is very nice to dine with the wind blowing through. It’s kind of like being a part of the earth. They have ceiling fans, but I do not think they really need them, or maybe it might be decoration. The restaurant is decorated with fun stuff giving one the feeling that they really are on Polynesia.

We were greeted at the door with a smile that made us most welcome.
Unfortunately the young person at the door may have been the most devoted person in the restaurant. There was a manager running around, but he was much too busy to spend any time with customers. We were seated promptly, and menus were presented at once. It would have been nice to have had a bit of a menu presentation as this was the first time to visit.
On the tables they had items that I think one can purchase. We were not sure if the tiki glasses were for sale as the tables had no information if the items could be purchased. A waiter dressed in a grass skirt took our drink orders, and he informed us that he would return back for our food orders. We didn’t mind this as it was our first time to visit here, so we went over all of the food items listed.
We ordered cheese burgers (what else), and in five minutes we received our order to our great surprise. The service here was fast! The waiter threw in front of us two plastic baskets with a lone burger in each basket. There were no French fries, no pickle or garnish, just the cheese burger. Well I guess we got what we ordered.


I’m sad to inform you that the burgers were dry as they were cooked once, then heated up when served. This confirms why we received our order so fast. The burgers were tasteless, and not worth the money we were charged. This restaurant is a tourist trap, and my recommendation would be to miss this one. The food could be better but in my opinion they just don’t care.
The Rock and Roll Chef
 Hangen Out with Ron Wood


Waikiki Sunset
18-04-2009
 Hangen Out with Ron Wood

Waikiki Sunset
18-04-2009
 Let's Eat, Rock and Roll!
Cook It - The Rock and Roll Chef - Eat It
Friday, November 6, 2009
Tuesday, May 5, 2009
The Rock and Roll Chef / Breakfast Fast Rocken
Breakfast Recipe
Here is my take when it is breakfast time at anytime, follow my rock and roll breakfast fast. Someone tells us that breakfast is the most important meal of the day. Personally I’m not sure if I buy that. On the other hand the rock and roll chef really likes to cook and eat breakfast. Do add in some fruit, vegetables, or chocolate. Just have fun, but don’t forget to wash your hands with some warm soapy water. Get some of that liquid soap stuff that comes with a pump, it’s that easy!
 I cut up my potato hash brown style. Just have ready some salt, pepper, garlic powder, olive oil, bacon and eggs.
 I cook everything on my grill, bacon in the middle, and the hash browns on either end. I do this because the ends are not so hot, where most of the heat is in the middle, great for bacon.
 It's easy, just cook your eggs anyway you want. Wow, you are now ready to eat your rock and roll Breakfast Fast!
Rock and Roll Delicious!
Tuesday, April 28, 2009
The Rock and Roll Chef / Rocken Time Out
Waikiki Beach Oahu Hawaii [Sunset / Sunrise / Surf]


Let’s all enjoy together some sweet views of Waikiki Beach in Hawaii. The photo on the top left is a sunset overlooking Kalakaua Avenue, and Waikiki Beach on April 26, 2009 at 6:50pm. The photo on the top right is a sunrise on April 27, 2009 at 6:00am again overlooking beautiful Waikiki Beach. The botom photos are just dreaming of the surf!
Have Fun and rock and roll enjoy Waikiki Beach Oahu Hawaii today!
Monday, April 27, 2009
The Rock and Roll Chef / Pasta Sauce Surprise
Pasta Sauce Surprise Recipe
 Here is my take of rock and roll Pasta Surprise! What is the surprise you ask? The surprise is that this is so easy! You should never need to purchase expensive pasta sauce in a jar ever again. In fact this is so easy, you can add in any ingredient you would like to add. Here today I’m going to show you the simple tomato sauce base. Some suggestions of ingredients that you can add are, fried hamburger, oh my blue cheese, sun dried tomatoes, onions, bacon, and just about nearly anything. What do you like, just chuck it in. I suggest that you start simple, and each time add in another ingredient that you like to form your own Past Sauce Surprise.
 The Main Ingredients:
Garlic Powder / Black Pepper / Paprika / Chili Powder / Oregano Leaves / Salt / One Can Tomato Soup / One Can Tomato / A Few Sun Dried Tomato / Any Pasta
Toss in to a saucepan on your stove all of the ingredients, and bring to a boil. If you can turn your stove burner onto the lowest setting and stir every so often. Get ready a large pot of water well salted. Do not put oil into the water that you will boil your pasta. If you add oil into the water that you will cook your pasta, you are only wasting money. The oil will add nothing to your cooking pasta. Please do not waste your money, just do not put any oil into the water that you will cook your pasta. If someone told you do this, then they simply do not know how to cook.
 Cook your pasta as per the instructions on the package. I hate to overcook pasta, so subtract one minute of the suggested cooking time that you pasta package suggests. Even when you drain the water, the pasta sill cooks a little bit, then you add on top hot sauce, the pasta cooks a little more. Subtracting one minute will give you a perfect pasta.
What I’m trying to say here is don’t waste your money, and just make your own sauce. In time you will never purchase a jar of pasta sauce again because your sauce will be better because it will be your sauce.
Don’t wear a white shirt, but just have a great dinner with your Pasta Sauce Surprise, you will be the hit of your house.
The Rock and Roll Chef / Baked Caribbean Jerk Chicken
Baked Caribbean Jerk Chicken Recipe
Wow not a beef recipe, my word! This is my take how to cook Baked Caribbean Jerk Chicken. This is rock and roll easy, so just get stuck in and give it a try. In fact I will have few instructions here so pay attention and just follow along with me.


The Main Ingredients:
Chicken Breasts / Pepper / Salt / Honey / Caribbean Jerk Seasoning
There are not so many ingredients for this recipe. Now here we go! In a bowl dump in one table spoon of the spices and mix it all together. Then coat the breasts with the spice mixture. Dump on all of that, two tablespoons of honey for each chicken breast.
Place your chicken breasts on a baking rack in a roasting pan. Cover the roasting pan tightly with tin foil. Place the chicken breasts in a preheated oven at 220 degrees for a total of 22 minutes. Uncover the pan during the last eight minutes, and continue baking.


In the meantime get your rock and roll side dishes ready as your chicken breasts are almost ready. Scroll down to get all of the side dish recipes.
Left: French Fresh Fried Cut Beans
Center: Really Orange Rice
Right: Rocken Hash Browns
 Once your chicken is done, let it rest for at leach 10 minutes, go and set your table or jog around the block, not. Anyway get your table set up, and get all of the team at the ready to eat. Slice your chicken breasts, and then plate everything up.


One more time, have a great Baked Caribbean Jerk Chicken, rock and roll!
Wow not a beef recipe, my word! This is my take how to cook Baked Caribbean Jerk Chicken. This is rock and roll easy, so just get stuck in and give it a try. In fact I will have few instructions here so pay attention and just follow along with me.


The Main Ingredients:
Chicken Breasts / Pepper / Salt / Honey / Caribbean Jerk Seasoning
There are not so many ingredients for this recipe. Now here we go! In a bowl dump in one table spoon of the spices and mix it all together. Then coat the breasts with the spice mixture. Dump on all of that, two tablespoons of honey for each chicken breast.
Place your chicken breasts on a baking rack in a roasting pan. Cover the roasting pan tightly with tin foil. Place the chicken breasts in a preheated oven at 220 degrees for a total of 22 minutes. Uncover the pan during the last eight minutes, and continue baking.


In the meantime get your rock and roll side dishes ready as your chicken breasts are almost ready. Scroll down to get all of the side dish recipes.
Left: French Fresh Fried Cut Beans
Center: Really Orange Rice
Right: Rocken Hash Browns
 Once your chicken is done, let it rest for at leach 10 minutes, go and set your table or jog around the block, not. Anyway get your table set up, and get all of the team at the ready to eat. Slice your chicken breasts, and then plate everything up.

One more time, have a great Baked Caribbean Jerk Chicken, rock and roll!
The Rock and Roll Chef / Really Orange Rice
Really Orange Rice Recipe
 The Rock and Roll Ingredients:
Rice / Orange Juice / Dried Cranberries
This is my twist to cook rice a different way. It’s all about adding flavor! You will not believe how simple this recipe is to excite your friends or family. In a rice cooker or in a pot on your stove, dump in two cups of rice. Then pour in orange juice to just a quarter of an inch over the level of the rice. Push the button on your rice cooker, or turn on your stove to boil the orange juice around your rice.
 I thought that while you are waiting for your rice to cook, you would enjoy this photo taken at 5:49am April 26th, 2009 of the sunrise at Waikiki Beach. Sit back and rock and roll dream a bit!
Once your rice is cooked, then fold in your cranberries, and serve. Watch the faces smile, this is the best way to add flavor to your next rice dish. Give this a try, you cannot go wrong. Have fun, you will never cook rice the same way again!
Rock and roll Really Orange Rice delicious!
Sunday, April 26, 2009
The Rock and Roll Chef / Rocken Hash Browns
Rocken Hash Browns Recipe
 I like my hash browns just the way Denny’s or Zippy’s cooks hash browns. Now you can also cook hash browns just the way you like to eat hash browns. You will never need to buy very expensive frozen hash browns ever again.
Just peel as many potatoes as you need, make extra because everything will get eaten up for sure. Use one of those 1950’s kitchen graters to hash you potato, use the side that has the large holes. Hash up you potato, and chuck into a fry pan that you have heated up with olive oil. Fry off your hash browns the way you like to eat your hash browns. If you like your hash browns soft, then cook about six minutes, if you like crispy hash browns, then just cook them as long as you want. Do taste along the way so that you will not overcook your hash browns.
Just have fun, impress your friends and family with your professional rock and roll Rocken Hash Browns!
The Rock and Roll Chef / French Fresh Fried Cut Beans
French Fresh Fried Cut Beans Recipe
I love my vegetables, so here is my take to cook your own rock and roll French Fresh Fried Cut Beans. This is so easy as the preparation time is three minutes, and cooking time is four minutes.
The Rock and Roll Ingredients:
Fresh French Beans / Butter / Salt / Garlic Powder / Chervil Leaves / Black Pepper / Paprika / Olive Oil / Chopped Onions


Melt some butter and olive oil in a fry pan. Dump in you chopped onions (use as little or as much onion as you want), chuck in your beans, add in on top of the beans and onions one teaspoon of each spice. Fry off all of that, four minutes. I suggest that you fry four minutes as the beans will still have a slight crunch when eaten. If you like very soft or mushy beans, then just fry the hell out of the beans for as long as you want.
The idea about cooking is to season dishes the way you like to taste your food, and just cook your food the way you like to eat your food. Don’t be afraid, just rock on and have a great French Fresh Fried Cut Beans dinner tonight!
Thursday, April 23, 2009
The Rock and Roll Chef / Spice Me Up Meat Balls
Spice Me Up Meat Balls Recipe
I will now take you through my take to make my rock and roll spicy meatballs. Just follow my step by step instructions, and you also will be able to make the best rock and roll meatballs in the world. You can eat these meatballs on their own, or bake in mushroom soup, or add the meatballs into your favorite pasta sauce. Be brave, and just do your best, don’t forget to wash your hands. Here we rock and roll meatball go!


The "Rock and Roll" Spices:
Black Pepper / Chervil Leaves / Salt / Dijon Mustard / lemon Juice / Olive Oil / Allspice / Garlic Powder / Oregano Leaves / Paprika / Cayenne Pepper / Onion Powder
The Main Ingredients:
Ground Beef / Onions / Egg
 Throw in your hamburger into a large bowl getting ready to mix. Crack in two eggs with the burger, chuck in a handful of onions, and add in one teaspoon of each spice. Wash your hands, and mix everything up together.
 Taking a time out, here is a sunset off of Maui, Hawaii today 23-04-2009. Is it rock and roll nice or not.
 Roll your hamburger into small balls, and fry off in a hot fry pan till they are all cooked. Take care when you move your meatballs around in the fry pan, we do not want you to break those great balls of spice up.
You are what you eat, have a great rock and roll dinner!
Wednesday, April 22, 2009
The Rock and Roll Chef / How To Cook Magazines
Check out these magazines that The Rock and Roll Chef uses to cook up those great meals. Check them out if you can, I like these ones!
 BBC Good Food: This is a great magazine as it is jammed packed full of recipes with great photos for most dishes. There are also some good chef stories, along with readers featured kitchens.
 Delicious: This is a foodie magazine from Australia. Lots of great recipes, photos of food, and chef stories. They have some different takes on food, so tuck into this one for sure!
 Waikiki Sunset: I had to throw this one in of today’s 22-04-2009 sunset at Waikiki Beach, Oahu, Hawaii. How sweet it is!
 BBC Olive: The last magazine I would suggest for you to consider is Olive. Olive is packed full of great recipes. They also try some twists of old stand by’s, I have tried some, and great dishes turned out for sure. Olive does not have as many photos as BBC Good Food, but still has enough photos for you to follow.
Have a rock and roll great foodie time with these great magazines.
Monday, April 20, 2009
The Rock and Roll Chef / Blow Me Up Beef Wellington
Blow Me Up Beef Wellington Recipe
This is my take on a recipe that is almost as old as food. This is a simple recipe but very tasty meal that will fill up your rock and roll team. You may think that there are so many steps, but just follow along and you will see that blow me up beef wellington is a very simple recipe to make. Rock and roll tasty for sure, and have a hoot with this one!


Starting with showing the completed wellington above, suggesting two ways to serve. The photo on the left is plain, and the wellington on the right has a BBQ sauce and some additional meat added. You can serve your wellington either way or even experiment with you own favorite sauces. Just scroll down and see my recipe for my rock and roll BBQ Sauce. Now onto the instructions, and remember this is really easy to make, you can cook it!


The Main Rock and Roll Ingredients:
Ground Beef / Mushrooms / Onions / Spinach / Cheese / Puff Sheet Pastry
The Rock and Roll Spices:
Black Pepper / Chervil / Salt / Dijon Mustard / Olive Oil / Cajun Seasoning / Garlic Powder / Cayenne Pepper / Onion Powder / Paprika / Soya Sauce


Okay listen carefully, firstly wash your hands right now. Your sink is right there, use it! Any rock and roll chef cleans their hands when handling food. Remember one thing, clean hands is clean food, right? Chop up your mushrooms and fry them off till they are about half cooked, wash your hands. Chop up your onion, and fry off till they are about half cooked, then wash your hands again. Fry off your hamburger till it is about three quarters cooked, you know by now, please go and wash your hands. This is when you dump in one tablespoon of each of your spices into your cooking hamburger. Don’t worry, toss them all in and fry the spices off for about five minutes with the hamburger. We are nearly there, that was the hard part. Also you can experiment with the sauces that you like, really you cannot go wrong with my blow me up rock and roll beef wellington.
Now we are ready for the build, let's go!
 Ready a clean dry cutting board and place your puff pastry sheet on top.
 I then paint a thin layer of my own rock and roll BBQ sauce as this will add to the flavor. Don’t put too much on the puff pastry sheet as we do not want to much water inside, water is not cool.
 I then spread out the cheese on top of my rock and roll BBQ sauce.
 Throw on an even layer of your mushrooms that you fried off.
 Dump on your hamburger and onions.
 Then on top of all of that add about three layers of your rock and roll raw spinach. With your kitchen brush, paint on an egg wash around the puff square pastry. This will help to stick everything together.
 Fold over the sides of your blow me up wellington, and paint on another layer of egg wash on the folded sides.
 Fold over the end of the puff pastry, and egg wash all of that. Don’t worry as you cannot use too much egg wash. Crimp all of that with your finger tips. Work it now, no need to be light, crimp it! Don’t forget to wash your hands, hey.
 Fold over the top half of your wellington, crimp, and egg wash all of that.


Now place your wellingtons on a baking sheet that you have oiled so things will not stick. I made two, but you can make one rock and roll wellington, or as many as you want. Bake in your rock and roll oven at 220C for about 20 minutes. Check out the progress after 20 minutes, you may need 5 more minutes just to further brown your wellingtons.
Remember that you can add any of your favorite sauces on top of your wellingtons. Now just sit down and enjoy your Rock and Roll Blow Me Up Beef Wellington!
This is my take on a recipe that is almost as old as food. This is a simple recipe but very tasty meal that will fill up your rock and roll team. You may think that there are so many steps, but just follow along and you will see that blow me up beef wellington is a very simple recipe to make. Rock and roll tasty for sure, and have a hoot with this one!


Starting with showing the completed wellington above, suggesting two ways to serve. The photo on the left is plain, and the wellington on the right has a BBQ sauce and some additional meat added. You can serve your wellington either way or even experiment with you own favorite sauces. Just scroll down and see my recipe for my rock and roll BBQ Sauce. Now onto the instructions, and remember this is really easy to make, you can cook it!


The Main Rock and Roll Ingredients:
Ground Beef / Mushrooms / Onions / Spinach / Cheese / Puff Sheet Pastry
The Rock and Roll Spices:
Black Pepper / Chervil / Salt / Dijon Mustard / Olive Oil / Cajun Seasoning / Garlic Powder / Cayenne Pepper / Onion Powder / Paprika / Soya Sauce


Okay listen carefully, firstly wash your hands right now. Your sink is right there, use it! Any rock and roll chef cleans their hands when handling food. Remember one thing, clean hands is clean food, right? Chop up your mushrooms and fry them off till they are about half cooked, wash your hands. Chop up your onion, and fry off till they are about half cooked, then wash your hands again. Fry off your hamburger till it is about three quarters cooked, you know by now, please go and wash your hands. This is when you dump in one tablespoon of each of your spices into your cooking hamburger. Don’t worry, toss them all in and fry the spices off for about five minutes with the hamburger. We are nearly there, that was the hard part. Also you can experiment with the sauces that you like, really you cannot go wrong with my blow me up rock and roll beef wellington.
Now we are ready for the build, let's go!
 Ready a clean dry cutting board and place your puff pastry sheet on top.
 I then paint a thin layer of my own rock and roll BBQ sauce as this will add to the flavor. Don’t put too much on the puff pastry sheet as we do not want to much water inside, water is not cool.
 I then spread out the cheese on top of my rock and roll BBQ sauce.
 Throw on an even layer of your mushrooms that you fried off.
 Dump on your hamburger and onions.
 Then on top of all of that add about three layers of your rock and roll raw spinach. With your kitchen brush, paint on an egg wash around the puff square pastry. This will help to stick everything together.
 Fold over the sides of your blow me up wellington, and paint on another layer of egg wash on the folded sides.
 Fold over the end of the puff pastry, and egg wash all of that. Don’t worry as you cannot use too much egg wash. Crimp all of that with your finger tips. Work it now, no need to be light, crimp it! Don’t forget to wash your hands, hey.
 Fold over the top half of your wellington, crimp, and egg wash all of that.

Now place your wellingtons on a baking sheet that you have oiled so things will not stick. I made two, but you can make one rock and roll wellington, or as many as you want. Bake in your rock and roll oven at 220C for about 20 minutes. Check out the progress after 20 minutes, you may need 5 more minutes just to further brown your wellingtons.
Remember that you can add any of your favorite sauces on top of your wellingtons. Now just sit down and enjoy your Rock and Roll Blow Me Up Beef Wellington!
Subscribe to:
Posts (Atom)

